Resideo App is used to adjust the temperature and thermostat schedule for the Dining Room and Meeting Room thermostats. Temperature can be controlled via schedule (preferred) or manually adjusted, until the next scheduled cycle begins.
Download and Installation
The Resideo app is only available on iOS and Android Mobile devices. Use of this app is by invitation only. Please refer to the User Management instructions to see how new users are created and installing the app.
Using the app
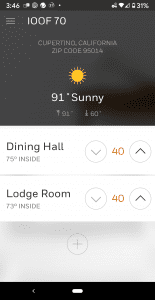
From the home screen of the app, you’ll see the thermostats for each room, Dining Hall and Lodge Room. Pressing on either name, you enter into the configuration for each thermostat. From here, you can manage temperature schedules, manual temperature adjustments, various modes and fan control. These items are addressed below.
From the home screen, you can make manual temperature updates. These temperatures will be automatically adjusted when the next time frame begins. It’s important to keep scheduling on, so the temperature can be updated on schedule, which includes turning it off at night.
Adjusting the Settings
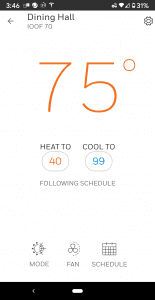
Tap into either thermostat, Dining Hall or Lodge Room, and you’ll see the settings for it as well as icons on the bottom to adjust schedule, fan and mode. It will tell you if it is currently following the schedule. The temperature at the top represents the current room temperature.
Fan Settings
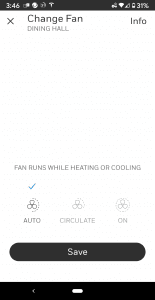
Press “Fan” at the bottom of the screen to access the fan control. For extra ventilation or air circulation the “Fan” can be turned to “Circulate” as during the scheduled time. But most of the time, we’ll want it to remain in “Auto.”
During big events, we want to manually turn “Circulate” on at the beginning of the schedule and off at the end. This will even out the temperature throughout the room.
Tap save, if you’re making changes, or the X in the top left, to return to the thermostat screen.
Mode Settings
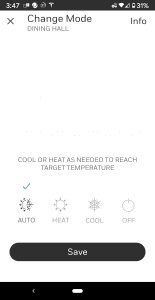
Press “Mode” at the bottom of the screen to access the mode control. In order for the Schedule to work, the “Mode” setting must be turned to “Auto.” It’s not recommended to use any of the other settings. Tap the X in the top left, to return to the thermostat screen.
Adjusting Heating/Cooling Schedule
Tap the “Schedule” icon to get to the schedule for the room.
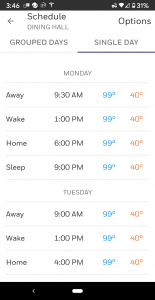
There are two tabs. “Grouped Days” and “Single Days.” The schedule works on a recurring, 7 day basis. Since our rental schedule can vary by day, it’s recommended we select the “Single Days” tab to make changes so the adjustments made will affect single days.
Each day is broken down into 4 time frames. Away, Wake, Home and Sleep. These names cannot be changed. Using these 4 time frames, we can set up to 4 different temperature settings throughout the day. From past experience, these should be more than needed since most of the time, we’ll likely want to keep the temperature at 70 degrees, when occupied.
Where “Sleep” is used to turn off the system at the end of the day, “Away,” “Wake,” and “Home” ranges can be used for 3 different settings during the day as required by the scheduled rentals or events.
Changing Temperature for a Given Time Frame
Tap on Single Day, at the top to insure that the change you make will only occur on that day.
Scroll down to the day where changes should be made.
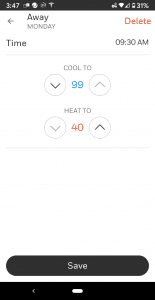
Tap on the time frame for the day you want to change and alter the temperatures as needed – Away, Wake, Home or Sleep.
When the room is not occupied, we’ll want to set “Heat to” to 40 and “Cool to” to 99. Since the room will likely never get as cold as 40 degrees, the heat will never turn on. And only if the room gets to 99 degrees or higher, will the AC come on.
When setting the schedule, for a desired temperature. In our Lodge, the heat coming into the room is about 120 degrees. Based on experience, in the Winter, 64 degrees is a good temp to heat to. 65 degrees is good if there is a small crowd (under 20) or elderly in the room.
When setting the schedule of 64 degrees, we’d set the “Heat to” to 64 and “Cool to” to 67. We want to leave 3 degrees between Heat and Cooling to reduce the risk of the AC and Furnace running at the same time.
Tap on the “Save” button to save the changes. Press the left arrow at the top to go back to the schedule screen.
The preferred temperature settings can be found here.